How do I build a simple but effective lightbulb vaporizer?
-
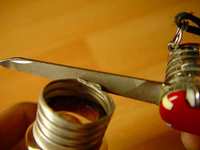 You might want to sand off those nasty metal edges since they are really sharp, like this: You might want to sand off those nasty metal edges since they are really sharp, like this:
Now, in step 2, we need to get the wire and all that out: (Remove them either with a small wrench or break them out with something else like a pair of pliers)
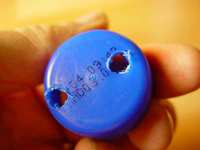 In step three, unscrew the cap of the bottle, and try to fit it on the metal part of the bulb, if it doesn't fit because it's too small, get another cap, it's ok if its too big. Now take a knife and make two holes into the cap, like this: In step three, unscrew the cap of the bottle, and try to fit it on the metal part of the bulb, if it doesn't fit because it's too small, get another cap, it's ok if its too big. Now take a knife and make two holes into the cap, like this:
Now we have to make the straws the right size, take the scissors. If you are using glasstubes, take a wrench to break them at the right point, and take fine sand paper to make the edges smooth.
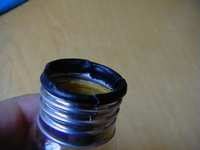 If the cap is a bit too big, just take the tape and fix it. Even though its easy to do this, every time you want to fill or empty it you have to tape it again. So try to get a cap that fits! There is another way you can tape it, like this, that's easier: If the cap is a bit too big, just take the tape and fix it. Even though its easy to do this, every time you want to fill or empty it you have to tape it again. So try to get a cap that fits! There is another way you can tape it, like this, that's easier:
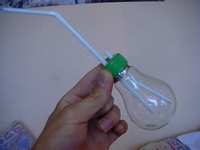 Before you use it for the first time take cold water and wrinse it out, glass and dust might be left inside, and you don't want that in your lungs....DONE! Before you use it for the first time take cold water and wrinse it out, glass and dust might be left inside, and you don't want that in your lungs....DONE!
To use it, unscrew the cap, put whatever you want to smoke inside (careful, you don't need as much as you need in a normal joint), take a lighter or candle and heat it, inhale, and when you taste something, its working.
Don't wait until it smokes, because that will leave stains. In the best case, you will take out the weed, for example, looking just like you put it in, but smelling like hay after you are done.
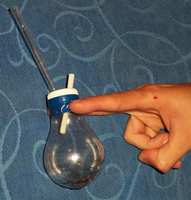 Here is a version with one glasstube instead of a straw, and how it actually looks when being used. Thanks DoobieScoo. Here is a version with one glasstube instead of a straw, and how it actually looks when being used. Thanks DoobieScoo.
[Editor's note: to see other people's variations, see the original faq thread]
Vlad the Impaler's modifications
Submitted: 04-06-2004
There is, I believe, a way to make it better: While most of the vapor created is kept inside, I was still losing vapor. This was my fault as I did not tape the cap on as suggested. After a bit, I made some modifications, and found that not only was it easier to use, but it worked quite a bit better as well.
I took the bottle that the cap came from (a US 20 oz bottle), and cut it off at the neck, so that the cut end of the upper portion (the part with the thread for the cap) would fit well over the screw part of the lightbulb. I then hot-glued (though duct tape works) the top portion of bottle onto the light bulb do I could screw the cap on and off.
 The first pic shows the unit assembled. The duct tape does not actually hold anything on, it is just insulation against the glass; it makes a good handle. You can make out the hot glue I used to put the bottle end onto the cap. It has just been used and is dirty. The first pic shows the unit assembled. The duct tape does not actually hold anything on, it is just insulation against the glass; it makes a good handle. You can make out the hot glue I used to put the bottle end onto the cap. It has just been used and is dirty.
 The second pic shows the cap unscrewed. You can see the threaded part of the bottle attached to the bulb. You can also see that I used a pen as the intake tube and two straws as a mouth peice. When you end the moutpiece tube as far up as I have, you need a filter to keep particles out. I used a nylon mesh (the kind on a screen door/window). All of this is sealed with hot glue (although duct tape works well too, I just had a glue gun around the house so I used it) The second pic shows the cap unscrewed. You can see the threaded part of the bottle attached to the bulb. You can also see that I used a pen as the intake tube and two straws as a mouth peice. When you end the moutpiece tube as far up as I have, you need a filter to keep particles out. I used a nylon mesh (the kind on a screen door/window). All of this is sealed with hot glue (although duct tape works well too, I just had a glue gun around the house so I used it)
 The third pic is a close up of the cap assembly. You can clearly see where the bottle has been attached, on the cut portion of the bulb, on the right of the duct tape, with hot glue. The third pic is a close up of the cap assembly. You can clearly see where the bottle has been attached, on the cut portion of the bulb, on the right of the duct tape, with hot glue.
 The fourth pic shows you where I cut the bottle. I cut it larger than needed, and cut it down to size after (much easier that way). The fourth pic shows you where I cut the bottle. I cut it larger than needed, and cut it down to size after (much easier that way).
|
|